How to clean wooden bird feeders
I promise it will only take twenty-minutes or so to clean a wooden bird feeder, which is important to know as a cleaning routine is vital to the birds health.
Prevent the build up of grime inside the feeder by regularly cleaning the wooden bird feeder in the garden. Disassemble all parts best you can, soak them in hot soapy water in a bowl used only for this purpose. Then scrub the interior with a hard brush while washing down painted or stain area with a splash of water.
How to clean a wooden bird feeder is by disassembling it as best you can; if you can remove as many parts as possible, it becomes a easier task.
Unlike cleaning a plastic bird feeder, the wooden alternative is a little trickier.
Concern is over how to clean a bird feeder made in wood that is stained or painted.
Outcome could be ruining the wooden bird feeder if the paint is to rub off; but in all honestly a quick, light scrub of hot soapy water is not going to show any lasting damage.
Focus of a fort-nightly (every two weeks) or monthly cleaning routine would be cleaning all removable parts - while scrubbing the areas what birds use to perch on most.
Get your hard brush inside the bird feeder as its here where stubborn food with all its run off moisture builds up.
Key to cleaning a wooden bird feeder is by dismantling it as best you can, before giving the parts a good soaking to soften hard grime.
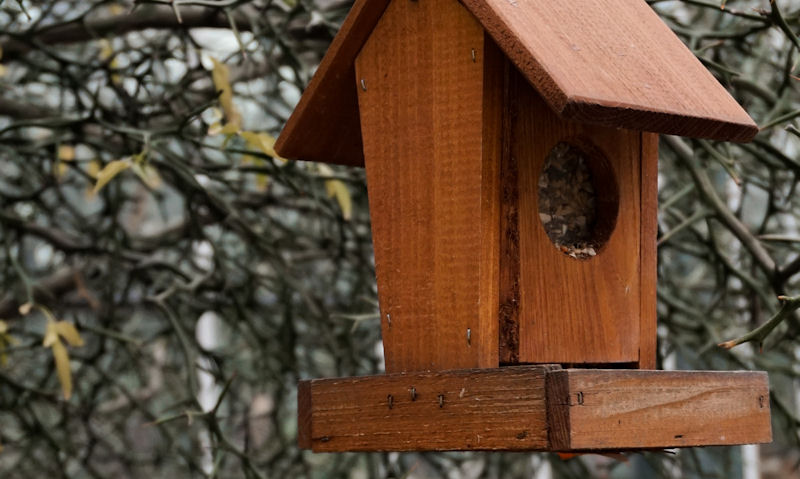
What are we talking about here is a wooden bird feeder that hangs off a bird feeding station, branch or bracket. But to know how to clean a wooden bird table, I go into more detail on its very own how-to.
Disassemble as instructed
Providing you are gloved up and following strict safe personal hygiene procedures, then let's begin by removing the hanging wooden bird feeder from its bracket or branch.
Now what you want to do is - with gloves still on mind you - is disassemble the bird feeder as instructed originally, or simply remove parts by memory.
Hanging feeders made out of wood don't require a lot of assembly out of the box, so there's not much to remove.
What you can do is pull up the lid or roof up the rope or chain its permanently fixed to as far as it would go - but they can't usually be removed all together.
Now you have access to the interior seed or peanut wooden bird feeder, so it just maybe possible to pull up the clear plastic window or metal mesh panel.
Fill water bowl in washing liquid
At this point I would assume you've got your bowl of hot soapy water sitting out in the garden on the ground only, for hygiene reasons.
In using a cheap plastic bowl, you can only use it now on for the purpose of washing bird feeding equipment outdoors.
Don't go overboard with cleaning agents or treatments, as only washing up liquid is required while other options could stain or damage the wood or paint.
Essentially all that's needed is bowl of soapy water with washing liquid - much like washing the dishes in the sink.
If at any point the water begins to get milder, and it will, its imperative you empty the water in the garden to top it up again with fresh hot soapy water.
It would be more difficult to remove stubborn grime in luke-warm or cold water.
Submerge metal or plastic parts
First thing you've hopefully done is disassemble the wooden bird feeder of all the parts that can be taken apart.
But all you need to do now is throw them into the hot bowl of soapy water.
What we want is a long soak of these parts to not only soften up hard food bits, but to allow easy removal after an extended soak with a scourer if need be.
So do not soak them for a short time but rather allow them to float in the water or stay sunk to the bottom of the bowl until at least ten minutes have passed.
In this time you will use the bowl of hot water to dip in your hard brush to wash the interior of the wooden bird feeder - including any fixings.
But never ever submerge painted or stained bird feeders in hot water as the water will turn colour - as the finish of the bird feeder melts off in the heat.
Brush interior with hard bristles
To tackle a treated wooden bird feeder of paint or stain is with a splash of hot water only, but only on the unfinished interior.
As a rule of thumb, wooden bird feeders are not often painted where the feed comes into contact with the wood for safety - even though paint or stain in use is usually a non-toxic formula.
But where a wooden bird feeder is in fact painted inside where the food goes, you can work it too hard with a brush, causing paint or stain to run off.
Instead, brush it as softly as you can but only briefly to prevent wear and tare of paint.
Treated timber refers to feeders finished in preserve to protect it from outdoor conditions, so its probably not bare wood but rather a treatment of natural or tinted preserve.
Splash water on painted areas
Now, to use a hard or soft brush, or a scourer on a painted wooden surface of any kind is never a good idea.
While the exterior areas of a wooden bird feeder can contain bacteria or buildup, its less likely to be a concern with hygiene.
We can then not worry too much about this part, other than using the hard brush on the perch area as well has the rim of the feeder where wild birds tend to cling onto.
However, you still must give this painted bird feeder a clean as best you can to be sure.
No need for brushes as splashing over hot soapy water on the bird feeder is all that is needed.
It may be possible to do it twice or three times if needed, but in doing so; do it quickly before washing off the surface of any soapy residue.
Remove soap residue
Whatever part of the bird feeder you happen to be cleaning off, its imperative you wash all parts with clean water to remove soap residue.
What this entails is the removal of soap that settles on a part you are cleaning for an extended time, which can stain the wooden white which is near impossible to remove later.
If you get to this soap residue only after a few minutes of cleaning the part, any soap build up can be simply washed away.
I recommend to use your current bowl for washing the parts, while using hot water only to throw over soapy parts - all all once or gradually as you go.
Same goes for cleaning out the interior of the bird feeder where soap build up can get trapped.
Reassemble only after air dry
Once you've finished cleaning the wooden bird feeder as best you can, one part at a time while saving the main feeder to last - its time to dry it up.
Reminder again, you must clear the wooden bird feeder of all soap residue before allowing the bird feeder to dry off.
It is possible to simply hang the bird feeder back up on its bracket to allow to air dry in the garden.
Or it could be possible to place the bird feeder plus parts on a wall or leave it on the concrete path or patio.
Avoid reassembling the bird feeder until its completely dry, as wet wood swells so as it dries up - the parts that are suppose to open for replenishing would now be impossible to open up at all.
Safety first approach
From a safety point of view, lots can go wrong while cleaning a wooden bird feeder, and while unlikely, could be riddled with disease.
So safety first by wearing gloves at all times, but never in a way that simply transfers bacteria to other surfaces.
Be careful not to touch anything else then the bird feeder or the cleaning equipment.
When entering the home mid-clean its imperative you remove the gloves carefully before putting them back on to continue cleaning the bird feeder outdoors.
I would also suggest wearing goggle or eyewear protection to prevent droplets splashing in your eyes.
Wash your hands thoroughly with use of a nearby tap outdoors, or the nearest sink in the house - but hopefully avoid the kitchen taps all together.
To summarise
Difficulty in cleaning a wooden bird feeder by hand is a concern of what happens to the paint or stained surface when exposed to hot water or soap.
While to be honest hot soapy water can be damaging to paint or stain, but if you approach the cleaning process quickly, you are likely to only see a little bleeding of paint or stain in the water.
Focus of cleaning a wooden bird feeder is its interior, just to remove stubborn food build up clinging to the inside walls.
Focus on the outside of the bird feeder on any perches or around the rim where birds tend to land as they feed from all angles.
Disassemble all parts as best you can to give them a good soaking in a designated water bowl - used exclusively with wild bird supplies only.
Large wooden painted areas can be splashed with hot soapy water with force, but a hose pipe or pressure washer would be a better option.
Finally, remove soap residue as build up of dry soap can be a big nuisance.


